|
Tutorial - Cleaning Up Your Existing Library
|
Next
|
Walking through a tutorial is the easiest way to understand the Embroidery Deduper©
process. In this tutorial, we'll demonstrate how to clean up and eliminate duplicates in
your existing collection of embroidery designs.
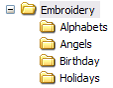
For this example, let's assume that your embroidery designs are stored under a folder
called "Embroidery" and are categorized into sub-folders by topic, as illustrated below :
The idea is to eliminate duplicates under each category of designs, such as "Angels",
and any sub-folders of that category. At the same time, we would like to allow
duplicates across categories. For example, we may wish to have a copy of an angel
design in the "Angels" folder and another copy of that same design under the "Holidays"
folder. However, we would not like to have two copies of the same angel design under
the same category (the "Angels" folder).
Fortunately, this is very easy to accomplish using the Embroidery Deduper©!
To get started, open the Embroidery Deduper© and click the "Add Directory" button on
the main window. When the Explorer-like window opens, choose the embroidery folder
in which your designs are stored, such as "c:\Embroidery".
Next, we'll need to set some preferences in order to tell the Embroidery Deduper© how
to process the folder we've chosen. To open the preferences window, choose Edit-
>Preferences from the main menu.
First, we'll need to tell the Embroidery Deduper© what design formats we prefer most.
This is called the File Type Priority
, and can be set by choosing your type of machine in
the File Type Priority panel in the upper left-hand corner of the Preferences window. If
you have a Brother, Babylock, Viking, or Janome machine, you can use one of the
presets. If not, you can choose the "Custom" radio button and adjust the priority to your
liking. The formats list goes from top to bottom, indicating your most-preferred format to
your least preferred format. For this example, we'll choose "Viking" as our preferred
format.
Second, we'll need to specify what's known as the Dedup Level
, which is the number of
levels beneath the chosen folder in which duplicates are not allowed. As a rule of
thumb, if you're deduping your main embroidery folder and you don't want duplicates in
your sub-folders, then choose a Dedup Level of 2. This is the level we'll use for this
tutorial. Choose a Dedup Level of 2 by clicking on the "2nd Level" radio button in the
"Directory Level Depth For Deduping" panel in the upper right-hand corner of the
Preferences window.
The rest of the preference settings in this window do not typically have to be changed,
so just leave those alone. Press the "Okay" button to save your preferences.
To begin the dedup process, click the "Begin Dedup!" button at the bottom of the main
screen. You'll see statistics indicating the progress of the dedup job.
Upon completion of the dedup processing, a Summary Window
that lists the duplicate
and non-preferred files that were found. After reviewing the findings, click the "Delete
Selected Files and Proceed" button to delete the identified files and proceed.
If errors were encountered while expanding zip or RAR files, another Summary Window
will open that shows which files have been quarantined. These "problematic" files were
moved to the Quarantine Directory
, in which you can attempt to extract them manually.
In all likelihood, however, the files are corrupted in some way. You may wish to re-
download the corrupted files, if possible.
If any multi-part RAR files were encountered, an additional Summary Window will open
showing those files. Multi-part RAR files are a special kind of RAR file and are not
currently supported by the
Embroidery Deduper©. Multi-part RAR files are left in their
original location. You may wish to attempt to manually extract these files.
Finally, the report window opens, allowing you to view a report that lists all duplicate and
non-preferred files, quarantined files, and Multi-part RAR files. The report can be
printed from your web browser or viewed at a later time, as it's stored in Log File
Directory
. After you have viewed the report file, you may click the "Finished" button to
return to the main window.